You’re back from your honeymoon, still glowing from the best day of your life, and now… you’ve got thousands of wedding photos sitting on your computer. They’re beautiful, emotional, chaotic, and let’s be honest — overwhelming. And somehow, all of them are supposed to magically fit into one elegant photobook you’ll treasure forever?
Take a breath. You don’t need to be a professional designer to turn those hundreds or thousands of photos into a wedding photobook that actually tells the story of your day.
Let’s walk through a practical, step-by-step approach to narrowing down, organizing, and designing your wedding photos in a way that brings meaning — not just aesthetics — to your final album.
Why a Wedding Photobook Matters More Than a USB Full of Images
Digital galleries are convenient. They’re easy to share and great for posting highlight reels online. But when it comes to preserving memories, a tangible photobook is in a league of its own.
It makes the experience real. It invites you to sit down, turn pages, remember emotions, see faces, and relive stories with family or friends. And unlike digital files—which can get lost or forgotten—a printed album becomes a legacy.
That’s why it pays to get this process right.
Step One: Back Up and Create a Master Folder
Before you even think about curating or designing anything, make sure all your photos are backed up in multiple places—cloud storage, external hard drive, wherever you’re digitally comfortable. Then, create one central ‘Wedding Photos’ folder. Within that, divide by source if needed: professional photographer, guests, photobooth, disposable cameras, etc.
Keeping everything in one place avoids accidental overlooks later on.
Step Two: Curate With a Clear Narrative in Mind
Here’s where things can feel daunting: trimming hundreds (or thousands) of images into a storyline that fits a photobook layout. The trick is to think like a storyteller.
Start by organizing your photos in a way that reflects the natural timeline of your wedding day.
For example:
- Getting ready
- First look
- Ceremony
- Family portraits
- Reception and speeches
- Dancing and afterparty
Don’t worry yet about layout or page limits. Just focus on identifying the strongest narrative.
Look for images that trigger emotion, show connection, and help tell what it felt like to be there.
These aren’t always the most “perfectly posed” shots.
Don’t Skip the Imperfect Shots
People often default to polished portraits. But candid moments—the flower girl yawning, your dad straightening your tie, a laugh between two friends—can become the emotional anchors of your photobook.
Let your heart guide your selection, not just visual perfection.
Step Three: Break It Down Into Mini-Chapters
Now that you’ve got a rough chronological arrangement, take it a step further. Divide the day into 5–6 key “sections.” Each of these can become a natural start for a new spread or chapter in your photobook.
Think:
- The Quiet Morning: Getting ready moments filled with anticipation.
- The First Look and Pre-Ceremony: Emotions before the vow exchange.
- The Ceremony: The walk down the aisle, vows, kiss.
- Portraits: Couple shots, bridal party, family.
- The Celebration: Reception details, toasts, dancing.
- The Joyful Ending: Last shots of the evening or afterparty.
Breaking your day down this way keeps things organized and digestible. It also makes your photobook feel intentional rather than chaotic.
Step Four: Make Tough Cuts (But Keep Favorites in a “Save” Folder)
It’s tempting to try including every single picture you love. But more isn’t always more. A photobook stuffed with 500 nearly identical images can feel cluttered and confusing.
Pare it down to the most meaningful images. Limit similar shots, only selecting the best angle or expression when there are multiples. If letting go of a photo feels impossible, drop it into a “For
Later” or “Save” folder. That way, it’s not lost—it’s just not overwhelming your core book.
Step Five: Choose a Photobook Format That Enhances Your Story
Not all photobooks are created equal, so consider what kind of final product best supports the tone of your wedding.
Do you want something sleek and minimalist? Or rich with custom covers, text pages, and thick, lay-flat pages?
When choosing a wedding photobook, think about:
- Size and layout (square, portrait, or landscape)
- Page count (how long is your story?)
- Cover materials (linen, leather, hardcover?)
- Paper quality (thicker stocks showcase photos best)
Ensure that whatever service you choose allows for smart image placement and high-resolution photo printing. You want the tactile feel and visual experience to match the emotional depth of the photos inside.
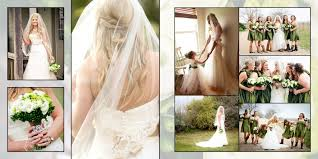
Step Six: Build Your Layout With Variety and Breathing Room
As you start designing your album, try treating each spread like a visual scene. Avoid cramming too many images onto one page. Instead, balance full-bleed hero shots with white space, grids, or single-photo spreads.
Here are a few layout tips:
- Use full-page images sparingly—for emotional or scenic moments.
- Vary your rhythm: follow a busy collage-style spread with a calm, minimalist one.
- Include descriptive captions for key images (optional but powerful).
- Don’t forget the opening and closing spreads—treat them like an invitation and a farewell.
It’s not about showing everything. It’s about guiding the viewer’s eye and emotion from start to finish.
Step Seven: Add Meaning With Words — But Keep It Simple
While your photos do the talking, adding a few well-placed captions, headings, or even a letter-style introduction can deepen the impact. You don’t need to write a novel. A quote from your vows, a favorite line from a speech, or a simple date marker can make a significant difference.
Some couples include:
- A one-page intro or “thank you” note
- Short quotes scattered throughout
- Titles for each section or chapter
Remember: text should support the photos, not overpower them.
Final Checks Before Going to Print
You’re almost there. But before hitting “order,” take a moment to zoom out.
- Review for flow: Does the story move naturally from start to finish?
- Are there any emotional highs or quiet moments missing?
- Did you check spellings, especially of names?
- Have you seen a preview of how it prints edge-to-edge (if applicable)?
Also, if your photo book company offers a printed proof or online flip-through, take advantage of it. Seeing your pages as “real” spreads can help you spot changes you won’t notice in thumbnails.
Conclusion: Your Wedding Deserves More Than a Cloud Folder
Crafting a meaningful, coherent wedding photobook isn’t just a way to preserve images—it’s a chance to turn fleeting moments into something tangible, beautiful, and lasting.
Don’t rush the process. Embrace it. Go slowly, be selective, revisit memories, and take pride in curating something that feels honest to your day.
Yes, it’s work. But it’s also a celebration—and one that gets better every time you flip a page.
So carve out the time. Start that folder. Pick your favorites. And bring your wedding back to life in a way no screen scroll ever could.